About Me

My photo
Hi! My name is Grace and I'm from the great state of Minnesota! I currently reside in Los Angeles, California and this is where I share all of the things I'm up to! Come along with me, let's be friends! Check out my Instagram where I post more things and stuff! http://instagram.com/grace_mcquillan

Sunday, June 29, 2014

FOTD: Warm Soul

This face of the day is inspired by Dominique @dominiqueldr on Instagram! Enjoy!


Product List:

Face:

Smashbox Liquid Halo HD Foundation 01 mixed with Revlon Colorstay Buff 150, Maybelline Age Rewind Concealer, Urban Decay Razor Sharp Finishing Powder, L'oreal True Match W6, Nars Laguna Bronzer.

Brows:

Anastasia Beverly Hills Brow Wiz Auburn, Anastasia Beverly Hills DipBrow Pomade Blonde.

Eyes:

Bh Cosmetics 120 Color Palette 3rd Edition, Lorac Pro Palette Taupe, Sable, Espresso, Nars Laguna Bronzer, Salon Perfect Lashes Demi Wispies.

Lips: NYX Butter Gloss Creme Brulee.


Thanks for reading!

xxgk

Friday, June 27, 2014

Face of the Day: Graphic Liner

Hi again! Here's another face of the day, enjoy!

Graphic Liner:


Product List

Face

Base:Nars Sheer Glow in Gobi, MAC Prolongwear Concealer in NC15, Rimmel Stay Matte in 001 Transparent. 
Contour: Nars Laguna Bronzer. 

Brows: Anastasia Beverly Hills Brow Wiz in Auburn, Dipbrow in Blonde, Maybelline Clear Mascara. 

Eyes: Lorac Pro Palette: Taupe through crease, Cream as browbone highlight and inner corner highlight, Urban Decay Naked 2 Palette: Tease in outer crease and on lower lid, Urban Decay 24/7 Glide on Eye Pencil in Bourbon, NYX Collection Noir Black Liquid Liner, L'oreal Voluminous Mascara. 

Lashes: Salon Perfect in Demi Wispies. 

Lips: NYX lip liner in Pale Pink, Maybelline Nudes lipstick in Bare All in the center of lips, NYX lipstick in Honey lightly dabbed over top.

Laters,

xxgk

HOW TO: Dramatic Smokey Eye

Tutorial time, enjoy! Here's the link to my album on Imgur: http://imgur.com/a/nmNvO


1. Here's a little before shot, lookin fly.


2. Start by priming your eyes. Blend in your primer using your fingertips or a small brush. I like to use concealers that don't crease, both the Maybelline Age Rewind and MAC Pro Longwear are great options. I prefer concealers like these over primers because they blank out any discoloration as well as provide creasless staying power.


3. I also went ahead and did my base and brows to make this a more pleasurable experience!


4. Next start defining your crease with a shade that is a few shades darker than your skin tone, this will create a smooth transition between the darker shadows we'll be using later. I used Nars Laguna Bronzer as my transition color. Laguna is a medium/light warm brown with a slight shimmer. Generally I wouldn't use shimmer in my crease but shimmery shades tend to blend easier (which is essential for this look) and most of the other shades we'll be using are matte so it'll balance out fine.


Using windshield wiper motions and a light hand I used a Sigma E25 brush to blend in the product from the outer to inner crease. Since this look is pretty blown out, I took a bit more product and blended it upwards, slightly above my crease. I created a bit of a "cat eye" shape because I want my eye to look more lifted.


5. Next take a slightly darker, warm tone brown, I used Sable from the Lorac Pro Palette. The goal here is to deepen the crease a bit, adding more dimension.


I took Sable on a Crown Brush SS012 Deluxe Crease Brush and buffed it into the outer half of my crease. Make sure not to bring this color above Laguna, as we want to create a blended look. I blended out any harsh lines with the Sigma E25 brush used earlier.


6. Next take a black shade with a flat shader brush and pat it on the lid. I used an SS011 Deluxe Oval Shadow Brush from Crown Brush. Be sure to keep this shade on the lid only. Blend out any harsh lines, but for the most part we want to keep the darkest shade low on the eye.


7. Then take any shimmery Taupe color, I used Pewter from the Lorac Pro Palette to keep it simple.


Take Pewter on a pencil brush and gently work it into the inner lid, blending it about 1/4 - 1/3 of the way across. I used another Crown brush for this.


8. Clean off the pencil brush and use it to define your lower lid with the same warm brown (Sable) we used earlier. Follow the curvature of your eye until you get about 7/8 (getting mathematical up in here) of the way across your lower lid.


Leaving space between your inner corner and where we stopped with Sable, drag whatever product is left on the pencil brush down a bit, tapering off how much pressure you apply as you go. Do this step very slowly and carefully, with a very light hand. You can always build up more product to make it more defined.

9. Then take a blending brush and lightly blend out the product to make it soft and diffused.


10. To add a bit more dimension to the lower lid, take a black shade on an angle brush and push it into the lower lash line. Take this color only about 1/2 way across the lower lid, again to keep the look soft. Then blend out the black with a small blending brush. I cleaned off the SS012 Deluxe Crease Brush and used that.


11. Next take a shade that's a couple shades lighter than your skin tone and use this to define your brow bone and inner corner. I used Cream from the Lorac Pro Palette on a small flat shader brush from Urban Decay (Good Karma Shadow Brush). I also used Cream on the same Urban Decay brush to clean up the lower lash line a bit and make the graphic detail look a bit more polished.


12. Then add your favorite black liner. I used one with a glossy finish to help it stand out against the black shadow.


To be exact, I used NYX Collection Noir Liquid Black Liner.


13. Then add a coat of mascara on the top and bottom lashes. I used Covergirl Clump Crusher on my top lashes and L'oreal Voluminous Waterproof on my bottom lashes.


14. If you'd like you can add false lashes. I find this step necessary because the look is quite dramatic and looks unfinished without them. I used Salon Perfect Lashes in Demi Wispies.


Boop! You’re all done!


Full Product List:

Face:


Base: Smashbox Liquid Halo HD Foundation in 01 mixed with Revlon Colorstay in 150 Buff, MAC Pro Longwear Concealer in NC15, Rimmel Stay Matte Powder in 001 Transparent.
Contour: L'oreal True Match Powder in W6, Nars Laguna Bronzer.


Lips
NYX Lip Liner in Pale Pink, NYX lipstick in Honey, NYX Pump it Up lip plumping gloss in Elizabeth 07.

Thanks for reading!

xxgk

Thursday, June 26, 2014

FOTD

Good morning! I thought I'd just post a little face of the day. Product list below, enjoy!


Product list:

Face:

Base: Smashbox Liquid Halo HD Foundation in 01 mixed with Revlon Colorstay in 150 Buff, MAC Pro Longwear Concealer in NC15, Rimmel Stay Matte Powder in 001 Transparent.

Contour: L'oreal True Match Powder in W6, Nars Laguna Bronzer.

Brows:

Anastasia Beverly Hills Dipbrow Pomade in Blonde, Maybelline Clear Mascara.

Eyes:

Nars Laguna Bronzer, Lorac Pro Palette: Cream, Sable, Black, and Pewter, NYX Collection Noir Liquid Black Liner, L'oreal Voluminous Mascara, Salon Perfect Lahses in Demi Wispies.

Lips: NYX Pump it Up lip plumping gloss in Elizabeth 07.

Laters,

xxgk

Wednesday, June 18, 2014

How To: Contour and Highlight For Everyday Wear

Hello again, today I present you with another tutorial! By request, I'll be going over my everyday highlighting and contouring routine. This routine is good for people who want to achieve that sculpted look, but don't want to spend 45 minutes getting there. If this sounds like you, buckle up and let's jump in!

1. In this first picture I've already applied my foundation. You'll want to have a nice "blank canvas" to work with. If you're one of the lucky ones and your skin is already a nice blank canvas then you can skip foundation and opt for something like a tinted moisturizer or just concealer.


For foundation I mixed Revlon Colorstay in Buff with Smashbox Liquid Halo HD Foundation in 01. I mixed the two because I wanted the staying power of Revlon Colorstay with the luminosity of Smashbox Liquid Halo. I used the SS014 Deluxe Flat Bronzer Brush from Crown Brush to buff it into my skin.


2. Next I concealed and highlighted with MAC Pro Longwear Concealer in NC15, using my Beauty Blender to blend. NC15 is a bit lighter than my natural skin color so it works well to conceal my undereye circles as well as highlight the areas outlined below. The basic concept of highlighting is that whatever you choose to make lighter will be softened and less defined. For example; since I want to make my undereye circles less defined, I will make them appear so by choosing a lighter shade than my skins actual color. This will reflect more light and make those areas appear brighter and softer. For this particular step of highlighting we want to avoid using products with shimmer in it. Having shimmery undereyes will just draw even more attention to those unwanted dark circles. 


3. Next I choose to cover any blemishes with Maybelline Fit Me Concealer in Light. I applied this concealer with my fingertips and patted it in until it was blended.


4. Then I went back in with some more highlighting to emphasize certain points on my face. I used NYX Jumbo Eye Pencil in Milk. If you prefer a more luminious look to your skin, then this is the step where you could use a product with shimmer in it. This step is different from the highlighting step above because we are emphasising smaller points that we want to be noticed instead of softening larger areas we want concealed. 


Below you'll see that I've applied Milk where I want to draw attention to. You can choose to highlight other areas as well, this is just my preference. I like the tops of my cheekbones to standout more because I like my face to look lifted. For this same reason I've highlihted above my brows to give the illusion of a higher, more lifted arch. I've also highlighted the bridge of my nose, tip of my nose, cupids bow and chin to draw more attention to the center, smaller part of my face.


I blended it all out with my Beauty Blender using dabbing motions. Be sure not to swipe when blending because you'll take away the base you've applied underneath. 


5. Then I set all of the cream and liquid products with Urban Decay Razor Sharp Ultra Definiton Finishing Powder, but you can use any translucent powder. This step will also help the powder products like blush and contouring powder blend in more smoothly. 


6. Next I moved on to contouring. The purpose of contouring is to make certain features more defined and certain features appear smaller. You can use contouring to make your cheekbones appear more sunken in making your face look slimmer. You can make your forehead look smaller and your nose look slimmer. This is because darker colors, when contrasted with lighter colors, will absorb more light and create, what looks like, a shadow. For this step you'll want to use a matte color that is one to two or two to three shades darker than your natural skin color. You want to stay from a shimmery powder because this won't look as natural. I've used Benefit Hoola Bronzer as my contouring powder.


In the picture below I've outlined the areas that I chose to contour. I have more volume in my cheeks so in order to make my face look slimmer I've added definition to my cheekbones and jaw line. I've also added a bit of contour to the sides of my forehead, this will also make that area look slimmer. If you have a smaller forehead and you want it to appear bigger, don't contour that area. I also want to give the illusion of a smaller nose, so I've contoured along the sides of my nose as well. I used a Sigma F50 Duo Fibre Brush to buff the product in. Be sure to use a light hand when working with bronzer or a contouring powder. You should apply it in layers, this will prevent it from looking patchy and muddy.


7. Then I added a bit of color back into my face using the peachy color from the Bh Cosmetics 10 Color Professional Blush Palette. I applied this with the SS013 Deluxe Angle Brush from Crown Brush to the middle of my cheek bones and sweeping upwards towards my temples. I did not apply this color to the apples of my cheeks because I want to give the illusion of a more lifted face. Adding color directly to the apples of my cheeks would draw attention to a lower part of my face than I prefer.


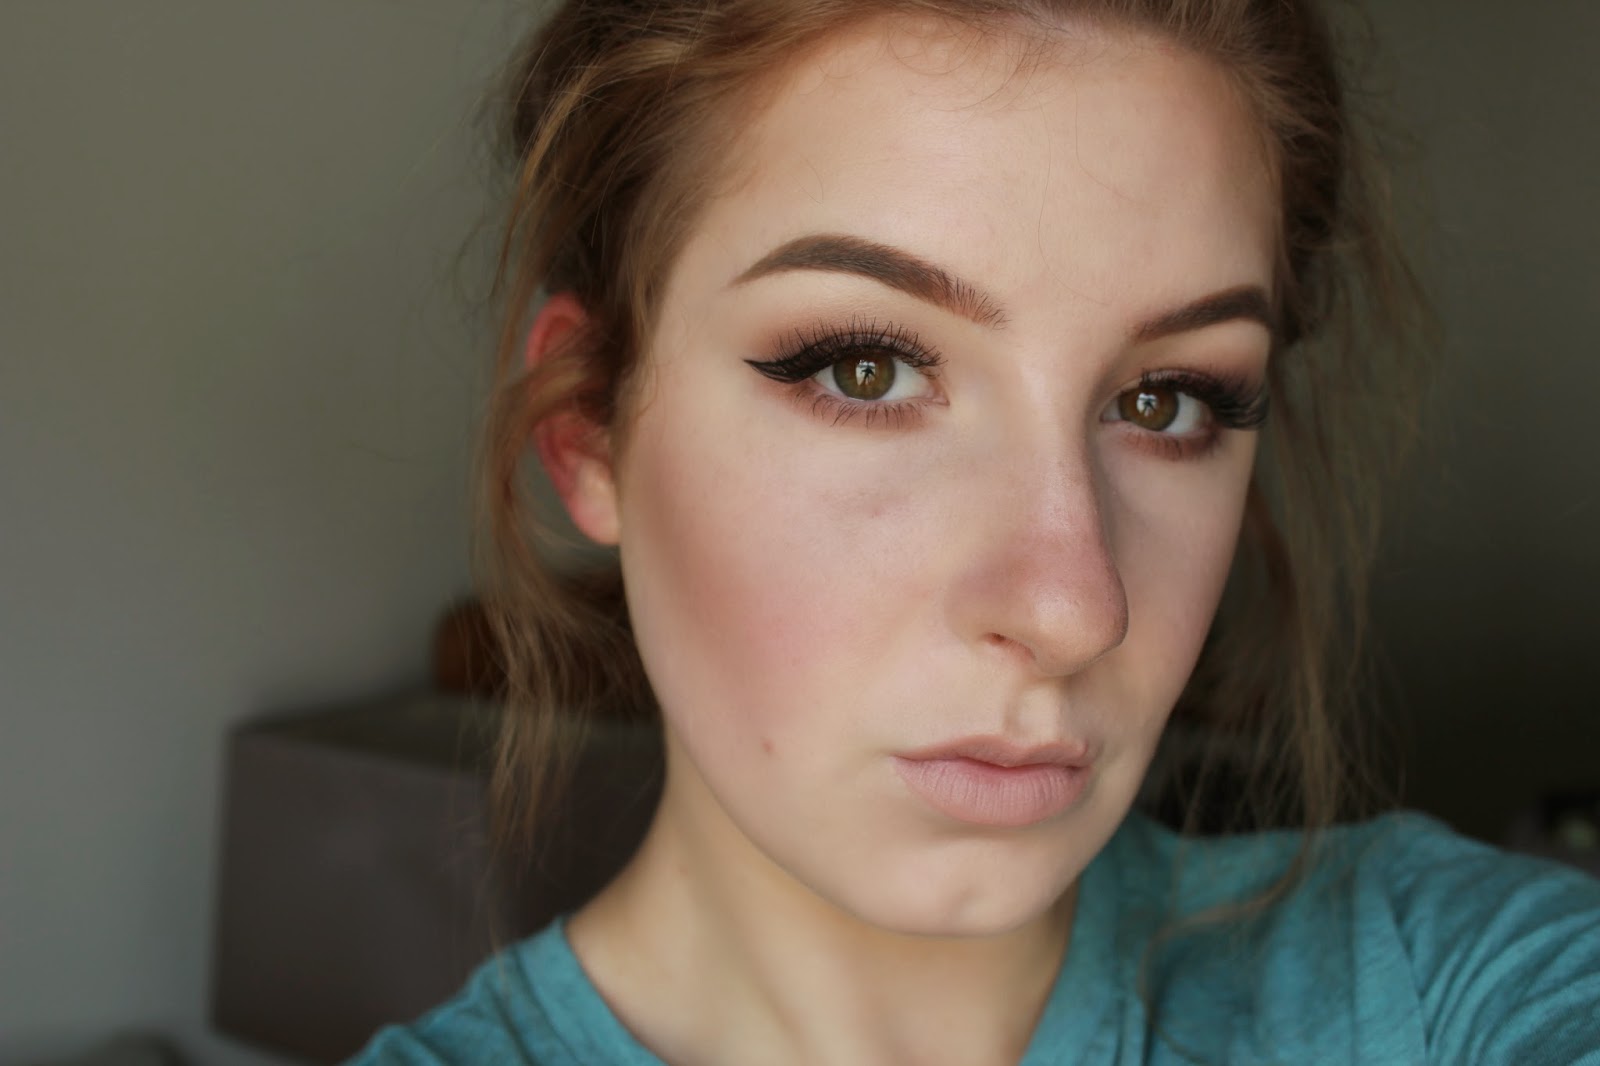
And that's the finished look! I hope this tutorial was helpful! If you have any questions feel free to leave them in the comments below! Thanks for reading! 


Laters,

xxgk